Thursday 21 July 2011

Moved, home & going ahead again.

Before I moved to Australia, I used to go to scrapbook workshops once in a while with my mum and sister. They scrapbook regularly and I joined in the fun when going to a workshop.
This week there was a workshop again. I brought some photo's from Surfers Paradise.I really like the squares with folded edges and blingbling brad in the middle. They remind me of a pillowcover I want to make from the Moda patterns. Hope you like how it turned out!

I haven't stopped working on my 60dgr Diamond Quilt though! During the move (even in the airplane!) & settling in, I managed to make another 12 stars.
And I have attached a few of them already. This morning, while the kids were having a play in the big playground in our village, I finishes some more. How good life can be ;-) .......
Talk to you sooner next time.
(Can't wait to start a new "traditional" quilt but still waiting for my sewing machine & fabric stash to arrive, sigh!!!!)

Tuesday 14 June 2011

New project!

Found it! I think this is THE perfect project if you want something portable or, as in my situation, something that can stay UNPACKED untill the very last moment and even be taken into the carry-on luggage in the airplane :-) flying us back home.
Blogging around I found the blog of a lady called Jessica that started this quilt-along. Have a look at her blog here. She started a Flickr group where all the ladies taking part in the quilt along upload photo's of their progress. Have a look here. So after this find, I started to get organised to take off on this project. I happen to have a perfect little folder to put everything in (Thanks Annemarie,!! Remember the Vichi-free-samples-folder you gave me a few years ago?)

All the plastic diamond templates, fabric diamonds, needles, thread, threadcutter etcetera fits in there snuggly!
I have decided to make a quilt with scrappy-stars. So each star will be made up out of 6 different fabric diamonds. I have cut the plastic templates out of No-Melt Mylar Template Plastic. I cut 6 60dgr diamonds out of all my left-over fabrics or not yet used fabrics. I intended not to buy any new fabrics since we're moving soon but as you can imagine that didn't go as planned ;-).

The way to go is: you lay a plastic template on the fabric diamond, fold over the sides. Slide over a paperclip for temporarly fixation (in the photo I used a hairpin because I couldn't find paperclips at that moment :-) ). With a needle and some thread you stitch the corners so they're attached. You'll end up with the diamonds on the bottom of the photo above.

After quite some fabric cutting and even a few diamonds folded & stitched, this is what I had.

When you have 6 diamonds folded&stitched, you'll hand-stitch them together and make them into a star.

And tataaaa! My first star! WOHOO!

To seperate the stars, there will be white diamonds in between.

And this is how they will fit into each other. It's actually quite addictive! Once you've started forming a star, you want to see it finished. And one that fits in there and so on.... Myrthe and Brent like to join in by arranging different diamonds into stars. I love it when they do that and have to think of a way to remember who 'made' which star. For now I've written their initial on the back but that will be covered up when I put on the backing. Mmmmmmmm.... If you have an idea!

My friends Jo, Ilse & Narelle kindly donated the fabrics in the photo underneath when they saw me working on this. How great is that!! Thanks heaps girls! Greatly appreciated.

It will be such a valuable memory having pieces of their fabrics in this quilt!

This is how far I have got for now. I have 1 1/2 more stars ready to go in my folder (so need to go buy 3 more fabrics to finish off that 1/2 star ;-) ), then I have used each fabric once. 5 more pieces of each fabric to go!

This (photo above plus the 1 1/2 star to come) is what I call 'the 1st set'. Now I am preparing 'set 2', which means doing the folding&stitching around the templates. Set 2 will be 1 diamond of each fabric as well but then differently arranged. And so on with set 3, 4, 5 and 6 in the end. Make sure you'll keep posted to see how I go!

Tuesday 7 June 2011

Craft night at Jo's.

Last Thursday night we had a craft night at my friend Jo's house. This was organised because another friend Deb was visiting Karratha after being away for quite a while. We used to craft together before so couldn't miss out on the opportunaty to craft togehter again.
With the 4 of us (Lorraine entered in the joy as well), we had a great creative night.
Jo was making a crad for her being part of the designteam at Do You Stack Up. Lorraine and Deb tried copic colouring after Jo filled them in on the do's and don'ts. I did some sewing and made this lovely pincushion following Jo's directions.
I love the shape and how easy it is to make. It only takes you 2 pieces of 5 inch squares fabric, a bit of ribbon and a button.
At the moment I am trying to get organised for the move back home. And since I also need to pack all my craft stuff, I needed a small project to work on in between all of this.. . . .
I will fill you in on what I'm working on soon.

Wednesday 1 June 2011

Rag quilt done!!!

Done, finished, klaar!! It is really done. After weeks of work in the evening hours or at our church-craft mornings, it is done.
I had taken photo's yesterday at midday but the intensity of the light was too much to get the colours come out as they deserve. So later in the afternoon today I made some new photo's.
A close-up of the clipped seams after washing the quilt. They tell you to wash the quilt to make the clipped seams go fluffier and fluffier. I was quite nervous putting it in the washing machine already, but all worked out well. And what a great difference already in the fluffyness (is this a word?) after just 1 wash.


And a close up of 1 of the corners so you can properly see the border that I've added.
I'm as happy as can be! Now I'll send it to the Netherlands so it will on our daughters bed when we come home!! (We're moving back home in 4 weeks, after 2 yrs Australia!) Hope you like how it turned out!

Sunday 29 May 2011

Almost done...

In between all other projects this one is still going. The rag quilt for my little girl. This week I finally put together all the squares & rows. Looking great, don't you think?
Normally you stitch and cut around the outer border like you did with the edges of the squares but I decided I prefer a proper border/binding. So went online and ordered some more fabric from the same range. It was quite hard because the range is sold out almost everywhere or just little bits left. Luckely I did find a shop that still had enough left.
I am in LOVE with this fabric. It really brightens the day. Then I started doing some maths to work out how wide the stripes should be to make the desired border (Yes, I know I should have done that before I ordered but thank goodness I ordered enough!!). I cut all the strips and am busy sewing them around the quilt. (Photo's of this will follow!) All that's left when I finished the border is cutting/clipping all the seams in the quilt. This makes the seams soft and fluffy. This is a picture of the seams before clipping.
And this is how it looks after a few hundred cuts. Very cuddly!!
I'm very glad I bought the special rag quilt scissors from Fiskars which make clipping the seams soooooo much easier. Hope you like it!

Tuesday 17 May 2011

It's done!

Finally I finished my first quilt! Wohoo. I'm so happy how it turned out.
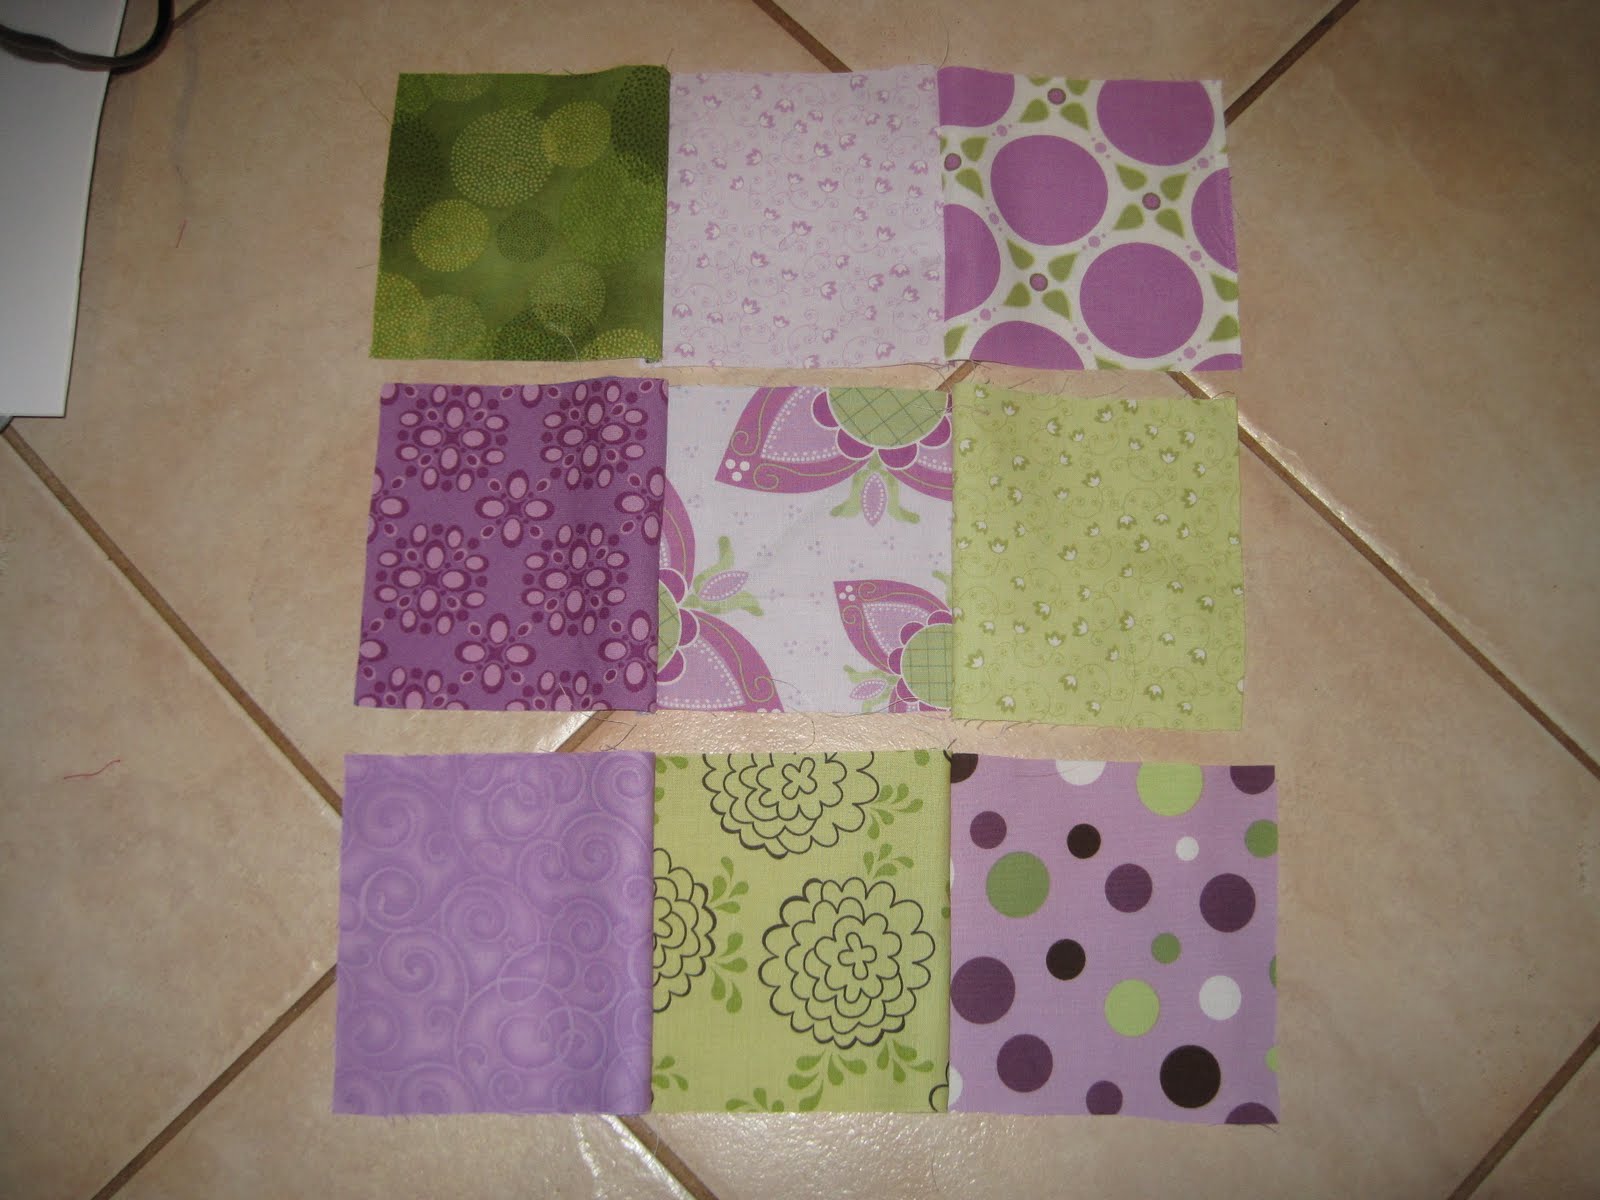
I loved making every bit from chosing the fabrics, sewing the squares together, the sashing (light purple around the 4x9 squares), the border (dark purple) and the binding (green edge).
I enjoyed the free motion quilting very much and am so happy I just did it. It just makes the quilt.
This is the backside. You can see how the squares pop-up, because of the machine quilting in straight lines around the edges of the squares.

I would love to start on a next quilt but I really have to focus on filling quite a few removal boxes now first because we are moving houses (and countries) in 5 weeks time.


Hope you like my quilt.

Saturday 14 May 2011

Found it !!

After waiting and thinking about what to do with the border, I finally found some more courage and decided just to try the free motion quilting. I thought since it's my first quilt ever, it's ok to have some irregularities. So half an hour before preparing dinner I put my sewing machine on the dinning table and took off.
See the silly gloves? They give a very good grip to move the fabric around.
I am soooooo happy I did take the step to try the free motion quilting!!! I think I did a pretty good job for a first and am very hapy with the outcome. The fabric is just perfect for it too.


When it did get to preparing dinner time my mum stepped in, so I could continu quilting. Thanks mum! After dinner I finished the quilting and trimmed the edges. Bit scary though ;-).


I had already prepared my binding a few days ago, so was able to just keep going. With the help of the tutorials mentioned on the Above All Fabric website adhering the binding wasn't a big problem to tackle either.


I still have to match up the beginning and the end of the binding as you can see in the photo and then handstitch the binding tothe back. I hope the kids will have a good afternoon nap today because I can't wait to finish it :-D.


This is how it looks from the front (still pins in the back to keep the binding in it's place!).


Hope you like it as much as I do!

Wednesday 11 May 2011

Quick project on the side.

Today I went to the second hand shop to try to find some glitter-fabric piece of clothing which I could turn into a circus-outfit for my daughter who's invited for a circus-themed birthdayparty this weekend. A friend gave me this advice since our craft shop is quite expensive. Well, I found a really great short black dress with gold glitter, perfect size for the circus-dance lady she wants to be, bargain prize $1, woohoo! I also found this little red shirt with airplanes and I remembered my son still has a (boring) red top waiting for some applique.
Luckely on the back of the shirt there were 2 complete airplanes, because all the ones on the front are missing the tail of front, which I didn't notice untill I was home, lesson learned here! (I think I can unpick the pocket and use the one underneath later). I used iron-on Vliesofix on the wrong side of the fabric and cut out the 2 airplanes. (for some weird reason this photo keeps turning on it's side ?!?!).


I ironed them on the front of the red top so they won't shift while I sew them on. (you can still see the change of colour from the heat of the iron, it changes back after cooling down!).


I used a blanket stitch on my sewing machine to sew them on.


And a happy, chappy little bloke!


And yes, my little girl was over the moon with her circus dress!

Monday 9 May 2011

Still going.....

After quite some basting and some time finding my courage I took the step to the actual quilting.
I decided to do machine quilting. I haven't got the patience for hand quilting and free motion looks great but...... very difficult. It was a challenge to handle this size and thickness under my machine.
But I am very pleased with hte result so far.
As told to do so, I started with the squares from the middle and worked my way to the edges. Then I did the sashing.
At this point I'm deliberating about how to do the borders for more then a week..... Not good :-(.

I tried some free motion with my new ordered darning foot but this really needs some more practice. Well I really want to get going so will have to make a decision soon!

See you later!

Friday 22 April 2011

Quilt in progress.

After a few more days this week sewing, pinning, ironing seams, cutting more strips etc. I'm quite a bit further on the way to finish my first quilt. The top was all done. Went to the craft shop (twice) to get fabric for the binding (the lime-green), the backing (the brown) en the batting (the white (soft bits that goes in betweet the top and back)).
After my first visit to the craft shop, I came home with the wrong size batting. I had asked for 46' and meant square but didn't say. So when I put everything together it happened to be 46' long but at the maximum 42' wide..... That's wasn't enough.

So went back the next day and explained the mistake and came home with much thicker, but the right width batting. I could continue my project.

Then the basting was the next step to take. This means you pin the top, batting and back together with curved safety pins. You pin on lots of places to keep them lined up well, so you can turn it all over without the layers sliding apart.

Now I need to get some courage to actually start quilting. I LOVE the free motion quilting but think that's to much risk of faillure since I haven't done it before and it requires quite some practicing to get it right. So I'll start with straigt line quilting, tonight :-D.

Have a good Easter Weekend!!

Monday 18 April 2011

Above All Fabric - Spring Quilt Along

A few weeks ago my friend Jo made me aware of the Spring Quilt Along that was going to run at http://www.aboveallfabric.com/ . This was the change to make a proper quilt with the help of a proffesional! Jo & I made our first quilt blocks a few months ago when Quilts-for-Queensland was on. The idea was to make 12inch quilt blocks, send them to a lady who would collect them and with the help of very experienced quilters make them into quilts. Those quilts are being hand out to people who lost their belongings in the Queensland floodings. What's nicer to get, when you've lost lots or even everything, than something specially handmade for you. So after a few blocks each, we were bitten by the quilt-bug. :-) You can see the Quilt Along on here: www.aboveallfabric.com/blog/?page_id=4542

This is 1 of her examples to get you going! Everybody can quilt along, you can upload photo's of your quilt on Flickr but don't need to if you don't want to (but then you won;t be able to win 1 of her $30 vouchers!).


First I just wanted to use my stash but allthough I've quite a bit, not enough different & still matching ones. So I had to go to the local craftshop and buy some more fabrics :-D. This is what I came up with.

The pattern says to cut 36 5 inch squares and lay them in 4 blocks of 9.

Then you sew them together row by row, block by block.


The next step is to sew the sashing in between. That's the fabric that goes between and around the blocks.


The border is what's following then. And all of this is, step by step, on the Above All Fabric Blog.

For some reason this last photo went on it's side, but you can see it all came together quite nice.

Wednesday she's going to explain to put on the batting (the soft bits in between the fabric on the front and back), the backing and quilting. Can't wait! Do have to have another visit to the craftshop for fabric for back & binding (the final edge to smooth the sides). How unfortunate ;-)!